The cabin filter is one of the few things requiring replacement when servicing the Nissan Leaf. This job is fairly straightforward, if a little fiddly. If left unchanged it can reduce airflow out of the vents and affect windscreen demisting performance.
There are 2 options for getting this done. One is best suited to those with small hands and requires no tools, unless you count a torch. The other involves removing the glove box, so takes longer and requires a screwdriver.
I don’t have small hands, but I chose option 1. By the way, this is also the way it’s described in the Leaf workshop manual.
Before getting started you’ll need a new filter. I got mine from a Nissan dealer, so I could legitimately say the vehicle had been serviced with genuine Nissan parts. I suspect they may have taken the opportunity to upsell me to a fancy premium filter.
Anyway, if you want a premium filter, the Nissan part number is 27891-3NLOP. A more standard offering would be a Mahle LA1205. I generally use Mahle or Mann for my aftermarket filter requirements.
Finding the Nissan Leaf cabin filter
Park the car in a place where you can get the front passenger door wide open. Open the door as wide as it will go. This will give you more space to work.
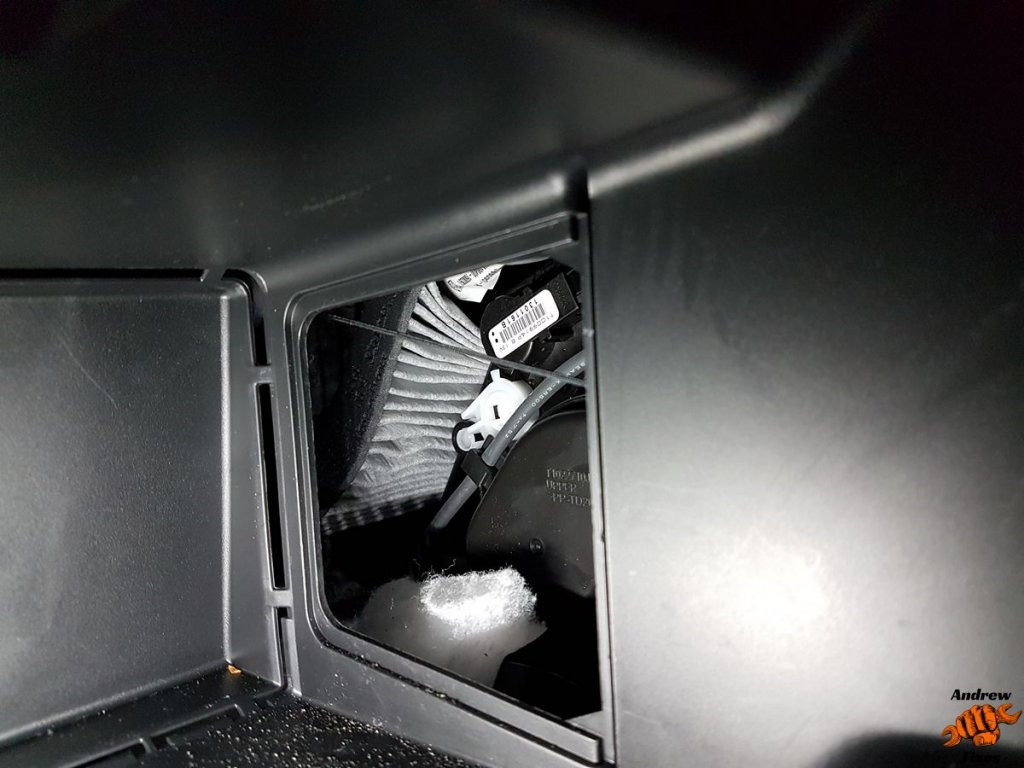
Open the glove box.
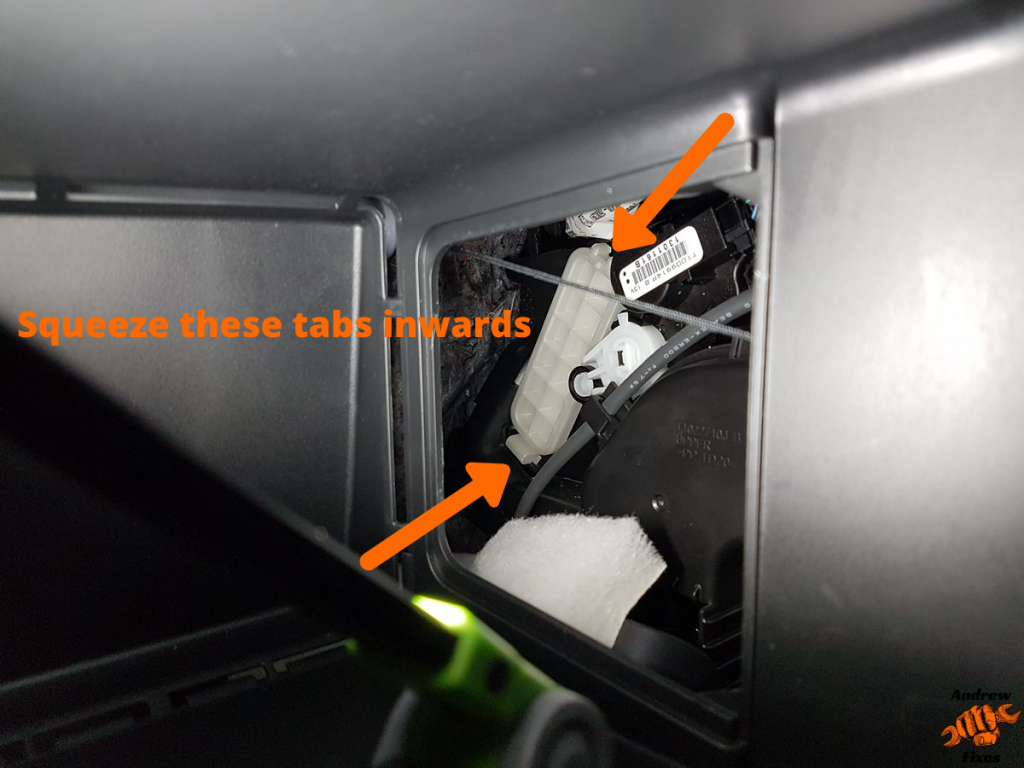
On the inboard side of the glove box, you’ll find a small panel. Pull it out using the handhold provided.

With this panel removed, you should be able to see a small white cover with clips at each end. A small torch will help. In my case, one of the clips had been broken off, presumably by accident during a previous cabin filter replacement. This car had a full Nissan service history, so you’d hope they’d have been more careful or replaced the broken part…..anyway I’d better not get myself started on that topic!
Squeeze the clips towards the centre of the cover. This should release it from the housing so it can be removed.
With the cover removed, you should now be able to see the cabin filter. Depending on which sort of filter you have, there may be a tab on the side that you can pull to remove it (the standard ones have this, the premium charcoal ones don’t).
Removing the cabin filter
Pull the filter out, remembering which way the ‘FRONT’ or airflow arrows were pointing. In case you haven’t clocked it already, the hole the filter has to pass through is smaller than the filter. This is a frustrating design, but it is what it is.
If the filter is absolutely filthy and covered in leaves, insects, hair, dust etc, you may want to do some gentle vacuuming inside the housing, if you have a vacuum attachment small enough to get in there. This will be easier if you remove the glove box.

Fitting the new cabin filter
Before you start, make sure your new filter is going in the correct way round. It will either have an arrow showing which side should face the front, or it will have an arrow indicating the airflow direction.
Now to the ‘fun’ part of the Nissan Leaf cabin filter replacement! You’ve already found out that the hole is smaller than the filter. Squash the filter down as carefully as you can, and feed it into the filter housing.
The filter I was using had bits of charcoal embedded, and some of them came loose during the squashing process. You can see them on the bottom of the glovebox in the picture. You won’t have this problem if you use a standard filter.
Once the filter is all the way into the housing, it should expand again to its original size. At this point you can refit the retaining cover and access panel in the side of the glove box.
The final step is to power up and turn the fan on full, then (hopefully) enjoy the improved airflow resulting from your work.