It’s thoroughly annoying when your Audi A3 door won’t open! Reaching across the car from the door that will still open, to reach the lever on the inside of the door that won’t….etc etc. If you’re reading this you probably already know that story!
In this article I’ll share with you how I fixed the door opening problem on a 2009 Audi A3 1.9 TDi Sportback (8PA model code). It had about 150,000 miles on the clock. There’s lots of information out there about replacing the door latch on these cars, but that wasn’t the problem in this case.
Investigating why the Audi A3 door won’t open
OK, the car in question was a 5 door. The right hand rear door had given up completely: it wouldn’t lock or unlock with the central locking.
The driver’s door (right hand front) would sometimes unlock and sometimes not. The front passenger (left) side door would also do the same thing, sometimes working and sometimes not.
I have VCDS because along with Japanese cars, I do quite a bit of work on Volkswagen Audi Group cars. Whilst it was expensive, it has paid for itself many times over.
There were loads of codes! Here is a list:
- Address 09: Cent. Elect.
- 01334 – Door Control Module; Rear Right (J389)
- 004 – No Signal/Communication
- 01334 – Door Control Module; Rear Right (J389)
- Address 19: CAN Gateway
- 00470 – Company Comfort Databus in Single Wire
- 011 – Open Circuit
- 01334 – Door Control Module; Rear Right (J389)
- 004 – No Signal/Communication
- 00470 – Company Comfort Databus in Single Wire
- Address 42: Door Elect, Driver
- 02071 – Local Databus
- 004 – No Signal/Communication
- 00928 – Locking Module for Central Locking; Front Driver Side (F220)
- 008 – Implausible Signal
- 00913 – Window Regulator Switch; Front Right Driver (E81)
- 008 – Implausible Signal – Intermittent
- 02071 – Local Databus
- Address 52: Door Elect, Pass.
- 01553 – Motor for Central Locking; Passenger Door (V57); Lock
- 012 – Electrical Fault in Circuit – Intermittent
- 00929 – Locking Module for Central Locking; Front Passenger Side (F221)
- 008 – Implausible Signal
- 00944 – Heated Exterior Mirror; Passenger Side (Z5)
- 012 – Electrical Fault in Circuit
- 01334 – Door Control Module; Rear Right (J389)
- 004 – No Signal/Communication
- 01553 – Motor for Central Locking; Passenger Door (V57); Lock
- Address 72: Door, Rear Right
- Cannot be reached
So a fair few fault codes then! Not all of them are directly related to the problem we’re tackling here, but I count 8 that are (one is duplicated)!
I acknowledge not everyone will have / want to buy / be able to afford VCDS. If you don’t have VCDS, there are plenty of folk who do, and will do a code scan for a small fee. If you can’t find anyone or don’t want to pay, read on and try what I did next as your first step!
Before going any further with more advanced diagnostics, I like to start with a thorough inspection. The easiest place I thought to start with this was to look at the wires between the body of the car and the driver’s door. Why here? Every time the door is opened, those wires have to flex. After nearly 10 years and 150,000 miles, they’ve done a lot of flexing!
It may seem counter intuitive to look at the wires going into the front door, when it’s the rear door with the biggest problem. However I’d read that on these cars, the rear door wiring goes via the door module in the front door.
So I started by unclipping and pulling back the bellows on the driver’s door….and I soon found a right mess: broken wires (yes, more than one) and wires with cracked insulation (again more than one). There was a good chance I’d found the reason why the Audi A3 door wouldn’t open. Even if I hadn’t found the only cause, I knew these breaks would need fixing before doing any further diagnosis.

Audi A3 door won’t open? Here’s how to fix it!
At first I thought I’d just solder the broken wires back together and put heat shrink sleeve or amalgamating tape over the sections with broken insulation. After thinking about this some more, I realised the solder joints and heat shrink would add extra thickness to the wiring loom at the point where it needed to pass through the narrow rubber bellows.
After more research I came across a wiring harness repair kit. When it arrived, I was really impressed with the quality. Much better (and more flexible) wire than the original loom.
Tools used for this repair
Before getting into the repair, here are the tools I used:
- Torx drivers or keys. I use this kit.
- Side cutters.
- Wire strippers.
- Solder sleeves.
- Hot air gun.
- Amalgamating tape.
- Cable ties.
- Bojo trim tools (plastic).
Remove the door card
In case you don’t know already, I also have a YouTube channel where I upload videos of most of my ‘fixes’. You’re best off watching the video for the detail of this, but here are some brief descriptions.
- There are 3 x T25 Torx screws to remove first. One of them is hidden behind the plastic panel next to the door handle.
- Once this is done, pull the door card out away from the door frame, at the bottom and sides of the card in particular.
- Next, gently lift the card up (it’s hooked onto the door frame along its length at the top) and it should come free from the door.
- Don’t get too keen with moving it yet! You still need to disconnect the internal door handle cable (a hook, fairly obvious) and the door card wiring loom. There is a connector with a pink tab: move this tab away from the door and lift up as you do. This will release the connector.
- You should now have a door card in your hands, free to be put out of the way for now.

Release the wiring loom

- Disconnect the wiring loom plug as it enters the A pillar.
- Remove the speaker (more T25 Torx screws).
- Cut the cable tie at the bottom of the window channel nearest the front.
- Gently remove the clips holding the wiring loom in place round the door.
- Push the upper rubber bung back in to the door frame.
- Thread the wiring harness out of the door until you have about a slightly longer length of wire than the repair piece.
- Unwrap the tape from the wiring harness, uncovering all the wire you’re going to cut out, plus some extra to give you space to separate the wires and work on them individually.

Cut out the old wires, solder in the new
Cut the old section of wiring harness away. I did this one wire at a time, to ensure I wouldn’t short any wires together using the side cutters. This was probably over cautious as I’d already disconnected the battery, but I really didn’t want to cause any more electrical issues!
Now it’s time to start soldering in the repair section. I used solder sleeves for this. They are easier (in my opinion) but more expensive. You can use ‘standard’ solder joints and heat shrink if you prefer.
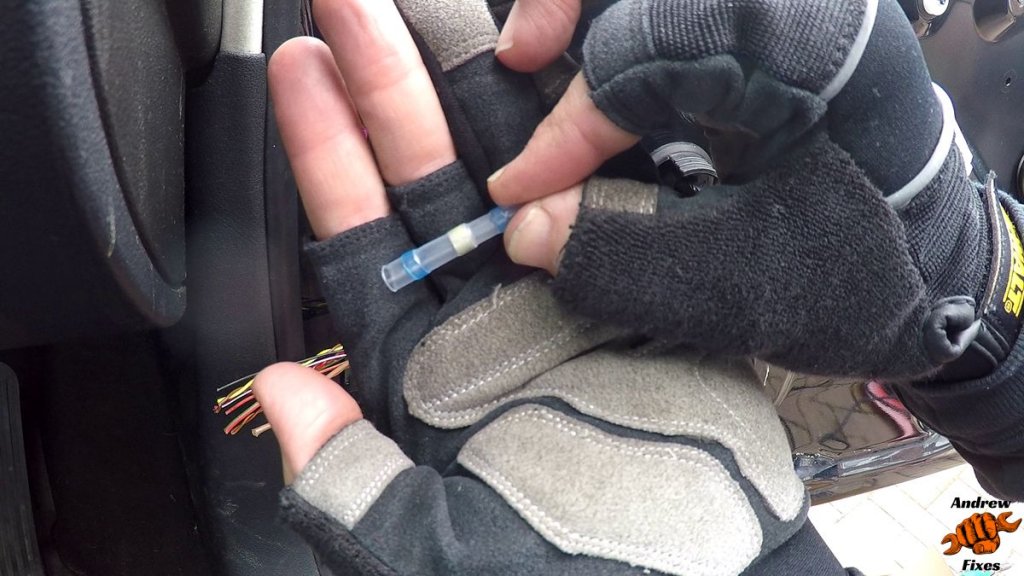
Whatever you do, fit the rubber bellows onto the new wiring before you start soldering! Hold it out of your way with a cable tie.
Some of the wire colours weren’t exactly the same on the repair section as on the original wiring in my case, so I checked the pin numbers between the old and new connectors, to make sure I was joining the correct wires together.

After you’re done, wrap the bare section of harness with amalgamating tape to protect it. Then it’s time to thread the harness back into position. When doing this, make sure you have the wires routed correctly inside the door, so they don’t catch on the window when it goes down. Remember the plastic clip and cable tie to hold the harness out of the way.
Next it’s time to plug everything back in and refit the door card.
Testing the repair
After this repair, the locking and unlocking on the driver’s side of the car was all fixed! Really satisfying to have the doors back to working order again!
Buoyed by my success, I went on to investigate the front passenger door wiring inside the bellows. No broken wires, but plenty of cracked insulation again. So I repeated this repair on the passenger side.
Going back to VCDS, all of the codes shown above, apart from those for the window regulator and heated mirror (those will be separate projects) had gone.
I call that a success! And not too expensive either – certainly cheaper and less wasteful doing it this way than replacing the whole door wiring harness.
I hope you manage to get your door problems sorted too!

Thanks for your site brilliant, all the info was Top notch, worked perfectly ordered the replacement part from Germany one thing that I did differently I shortened the replacement cables by about 2 1/2 inches so that when they were reinstalled they were not on a bend . Ps my problem was rear door and window not working and interestingly mine was at 2009 model thanks again..
That’s great to hear Simon, thanks for letting me know and for sharing your tip.