What’s involved in a Stiga Park 120 service? Read on to find out.
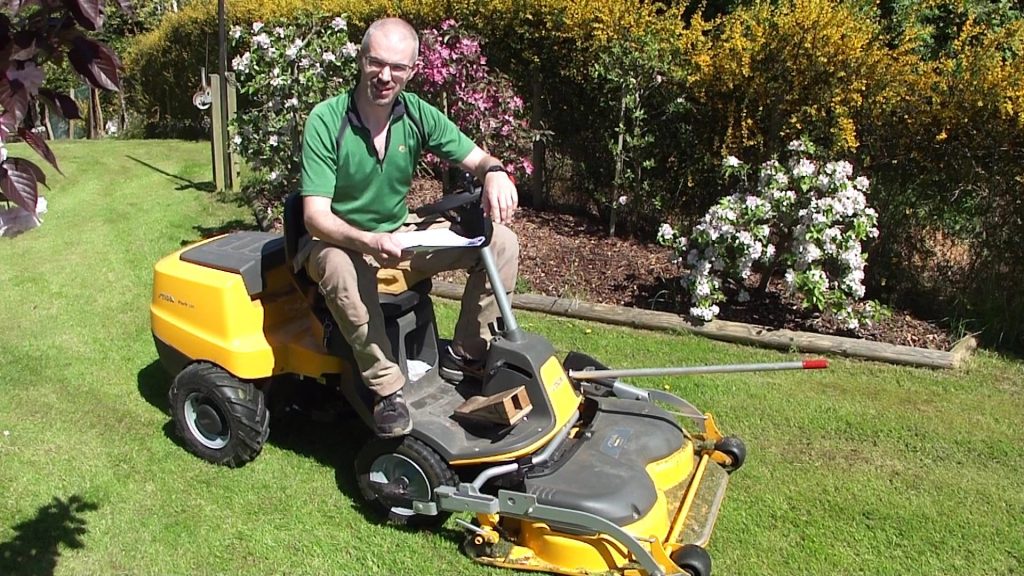
The Stiga Park 120 is a ride on lawn mower with great manoeuvrability thanks to being articulated in the middle. The cutting deck mulches the cut grass and leaves it on the lawn.
I’m going to take you through the service I did on one of these machines. I also recorded a video of me doing the service – there’s a link at the bottom of the page.
Test drive (cut?)
The first thing I like to do is the test drive, and of course for a grass cutting machine this should include a test cut. What sort of things to look for?
Engine
- Is there a smell of petrol? There shouldn’t be!
- Does the engine start easily (on the choke if cold)?
- Does the engine idle smoothly?
- Any rattles or unusually loud noises coming from the engine or exhaust?
Drivetrain
- Does the parking brake hold the mower on a hill?
- Are there any abnormal noises or movement when engaging forward or reverse drive? Is there a smooth transition from slow to fast speeds?
Cutting the grass
- Does the cutting deck raising and lowering mechanism work properly?
- Does the blade drive engage and disengage correctly.
- Is there any abnormal vibration when the blades are engaged (indicating worn bearings, unbalanced blades etc)?
- Is it cutting the grass cleanly and evenly?
Safety checks
Your Stiga Park 120 service should include checking that all the built in safety mechanisms are working:
- You shouldn’t be able to start the engine if the seat is unoccupied, and if the engine is running, it should stop if you stand up off the seat.
- The engine shouldn’t start if the parking brake is off.
- The blades should not engage if the cutting deck is in the raised position or in the maintenance position.
On to the service!
Tools I used for this Stiga Park 120 service
- Multimeter.
- 8 mm spanners.
- T30 Torx bit and Bosch IXO electric screwdriver.
- 10 mm spark plug socket, ratchet and extension (I used 1/2″ but 3/8″ would be fine).
- Spark plug gap tool or feeler gauges.
- 13mm socket and ratchet.
- Tyre pressure gauge.
- Copper grease.
- Flat blade screwdriver / pry tool.
- Pliers.
- Compressed air and blow gun.
Removing the engine cover
With the test drive completed, you may now have a list of issues to address in the service. In my case, the mower was quite new so there wasn’t anything on my list, other than the standard items which follow below.
Before you get stuck into any of the servicing items, you’ll need to remove the engine cover. This involves undoing the 4 x T20 Torx bolts. You’ll also need to remove the petrol filler cap.

Oil Change
If you do nothing else in your Stiga Park 120 service, please change the oil! The service I did on this mower was its first service and it had been left far longer than it should have been (not down to me I hasten to add). The engine is a Global Garden Products WM series, TRE 0702. There is no oil filter.
The manufacturer advises the first oil change is done after 5 hours of running, then every 50 hours after that (or 25 hours if operating in hot conditions or under heavy loads).
Draining the oil is simple and just requires removal of the bung from the drain tube. You’ll need a shallow drain container. The oil I drained out looked horrible and well overdue for a change, so stick to that 5 hours running time for the first oil change.
The recommended oil is 10W30, conforming to API SF or SG requirements. The capacity is listed as 1.2 litres and this one took just under that. I used Mannol Special Plus 10w30, which is a semi synthetic oil. This is a few iterations on from API SF/SG in that it conforms to API SL. As I understand it there is backward compatibility in these standards.
When checking the oil level, the dipstick needs to be screwed all the way in and then removed again to check. This is different to many motorcycles, where the dipstick is removed and placed back in just to where the threads start, to check the level.
Air filter
The air filter is a familiar paper element type. There is also a sponge pre-filter, which in this engine was dry rather than oiled.
The filter was really clean. The pre-filter had some grass and dust on so I gave it a clean before drying it and refitting. It isn’t the type of filter that needs oiling.

Spark plug
This is a Champion RC12YC. The old one didn’t look too worn but I had already bought a new one ready for the service, so I replaced it.
The spark plug gap is 0.6 – 0.8 mm. The plug I’d bought was already bang in the middle at 0.7 mm.
I always lubricate the threads of a new spark plug with a small amount of engine oil before installation. Make sure you follow the manufacturer’s instructions for tightening the plug and don’t overdo it!
Battery and charging system
This Stiga is kept on a battery conditioner / charger when not in use, so I wasn’t expecting any problems. Important to check all the same…and my checks involved the following:
- Check the battery terminal connections are secure. Check the battery is mounted securely.
- Measure the battery voltage using a multimeter. You’d expect a healthy fully charged battery to be at least 12.6 v. In this case the voltage was 12.7 v.
- Leaving the multimeter in place, crank the engine and measure the voltage drop across the battery. The voltage shouldn’t go below 10 v when doing this test and if it does, it may be time for a new battery. The reading was 10.7 v in this case, so all is well with the battery.
- Check the voltage across the battery with the engine running, to make sure it is being charged. You’re looking for an absolute minimum of 13.5 volts for this test, and if you get a reading above 15 v, you may have a fault with the charging circuit.
Fuel tank and lines
Check the fuel tank and fuel hoses for leaks. Also check for any leaks from the carburettor.
There is an inline fuel filter to check as well. In my case it looked clean so I didn’t feel the need to change it.
Exhaust system
Have a look over the exhaust pipe and silencer (muffler) for rust and leaks. While you’re there, check the bolts are tight.
Wheels & Tyres
Check the wheels for dents and trueness.
Check the tyres for cuts, bulges and punctures.
Stiga recommend a pressure of 15 psi or 1 bar (I know that’s not an exact conversion but close enough).
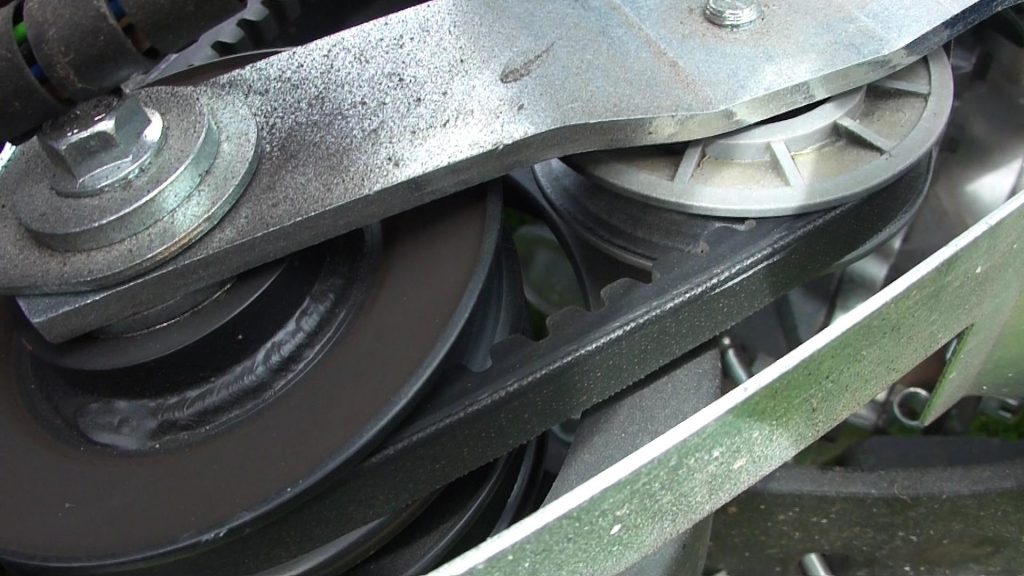
Belts
There are 2 belts taking the drive from the engine to the cutting deck. They both run round a pulley mounted at the central pivot point of the mower. There are also 2 belts on the cutting deck (under the grey cover).
Check the belts are in good condition. To me, this means no fragments missing or bits hanging off. It also means checking the drive surfaces of the belt aren’t so shiny that they can’t grip the pulleys properly.
Finally, check the belt tension. You’ll see me do this in the video by just grabbing the belt and pulling it from side to side. I’ve always done it this way so unfortunately I don’t have a more scientific option for you. There are various methods of measuring belt deflection under a given load, but I’ve never really found the need for them.
Lubrication
Lubricate the control lines, steering chain and steering cable pulleys. The manual just advises using ‘oil’ and I can’t get too excited about using a particular type of oil. I usually fill my oil can with the bits of engine oil left over after servicing. Gear oil would also be fine.
You could also lubricate the front wheel axles if you wish. I didn’t do them on this mower because there was still plenty of grease on them.
Cutting deck
Lift up the cutting deck and remove as much of the caked on grass as you can. Inspect the cutting deck for damage and rust. Repair or replace if necessary.
Blades
Wear gloves! Turn the blades by hand: whilst doing this listen for bearing noise and feel for any crunching or grinding, indicating abnormal bearing wear. Check the blade driveshafts aren’t bent. Holding each blade around its central point, check for play in the bearings by trying to move the blade from side to side.
Check the cutting edges of the blades: if really blunt you may wish to sharpen them and if there are any large bits missing (what have you been mowing?!) it may be time for a new blade or rebalancing at the very least.
You’re done with your Stiga Park 120 Service!
That’s it, you’ve completed your service. All you need to do now is put the engine cover back on. Happy mowing, and please let me know in the comments if you think I’ve missed anything or if you have any hints and tips for servicing this type of mower.
Here is a video of me servicing a Stiga Park 120


Hi Andrew
What battery charger do you use – is there an original charger?
Hi Claus
As far as I know there isn’t an original charger. The one used on this Stiga isn’t anything special – an unbranded battery trickle charger / maintainer. However if I was buying one from scratch I’d get a CTek MXS 5.0. I own one of these as well and use it for cars, motorcycles etc. It’s a really good charger/maintainer and has modes for AGM batteries as well as for reconditioning batteries.
Andrew
Jeg har lige bestilt en original lader ved AP motorcenter Højby
Hi Andrew,
you might know how long the life of the batteries for a park 120 should last? We have already replaced the batteries once and the mower is barely three years old. The people who sold it to us just want to sell us new batteries. they just don’t keep their charge.
Any ideas? Manythanks,
Tom
Hi Tom
It will really depend on how often it is used and the quality of the batteries being fitted. I’d expect at least 2 years.
A few things come to mind to check / consider. Firstly are the battery terminal connections tight? Has the charging system been checked to make sure it is working properly? Does it have the correct size battery fitted? Has it been checked for a parasitic drain – something slowly draining the battery when switched off? They aren’t very complicated electronics-wise but it would be worth checking, although I’d expect the battery to drain even more quickly than you’re experiencing.
Finally, you could consider using a battery conditioner / maintainer. The Park 120 featured in this article is connected to a battery maintainer all the time when not in use and it has had the same battery on for at least 4 years.
Cheers
Andrew
Thanks. Very useful in contrast to the Stiga handbook which is useless!
Thanks David, glad it was useful!