The Hayter Harrier is a great rotary lawn mower! It had been in production for some time and is still manufactured today. It’s important to give your Hayter Harrier a service to keep it running well. Well that’s my view anyway! I find it really frustrating to use a lawnmower that isn’t cutting cleanly or won’t idle properly. Both of those things applied to the mower featured in this article.

Welcome to my Hayter Harrier service guide! There’s a link to a video of me doing this service at the end of the article if you prefer that.
Parts for Hayter Harrier Service
- Engine oil.
- Air filter.
- Air pre-filter.
- Fuel filter.
- Fuel hose.
- Cutting blade.
- Spark plug.
- Carburettor refurb kit.
- Carburettor cleaner spray.
Tools for Hayter Harrier Service
- 8 mm socket.
- 10 mm socket.
- 3/8″ socket.
- 1/2″ socket.
- Ratchet and extensions (I prefer 1/4 inch drive for jobs like this).
- Hose clamp.
- Flat and Phillips screwdrivers.
- Ruler.
- Carburettor cleaning brushes and wires.
Hayter Harrier Service Guide
Engine
The engine is a single cylinder Briggs and Stratton Quantum unit.
One of the most important things we’ll be doing is changing the engine oil. The old engine oil will flow out much better (and bring more dirt with it) if the engine can be warmed up first. So if the engine still has plenty of oil in and it can be started, run it for a few minutes to warm it up. Don’t let it get so hot that it will burn you when you touch it.
On to the dismantling! Start by removing the top plastic cover. This is held on by 2 Phillips screws.
The mower needs to be tipped onto it’s side for the oil change, so it would be best if the fuel tank is fairly empty, or at best drained. I wanted to change the fuel completely because I knew this mower had been stood for a while, so I chose to remove the fuel tank altogether.
Remove the fuel tank (optional)
With the top cover removed, you’ll see 3 x 8 mm bolts around the edge of the starter housing. Remove these.
There’s one more bolt before you can take the tank off. This is a 10 mm underneath the tank on the same side as the filler cap. I used a socket on a wobble extension to get to it.
That’s all the bolts, just the hose and starter cord left.
Loosen the starter cord guides so it can be released and passed back through the hole in the centre of the tank.
This will enable the tank to be tilted downwards, so the fuel stays in the tank when you disconnect the hose. You can also use a hose clamp (or some locking pliers with tube over their jaws) to stop the fuel coming out.
Use some pliers to release the hose clamp at the carburettor end and slide it backwards along the fuel hose. The fuel hose can now be released from the carburettor and then the tank can be removed and drained.
I’ll mention at this point that if your mower is old, has been stood for a while or isn’t running well, I suggest you drain and clean the tank as best you can. Look what I found in this one.

Oil change
If you only do one thing, change the oil! It’s so important to keeping the engine running well.
Find a shallow container that will hold about 600 ml of oil. Then remove the dipstick and put it somewhere clean and out of the way.
Tip the mower over so the dipstick side is nearest the ground. Place your container under the oil fill / dipstick hole as you tip it over. Eventually the mower will rest on it’s side and by this time there should be some oil coming out.

Leave it to drain for as long as you can.
Once the oil has drained it’s time to put it back upright and refill with some fresh oil. The type of oil to use is a much-debated topic whatever the engine. I used a fully synthetic 10w30 because I had some left over, but I’d usually use a fully synthetic 5w30 as I always have lots on hand. The manufacturer originally recommended SAE 30 oil but have updated their recommendations as oil technology has moved on.
Spark plug
Remove the spark plug HT lead from the spark plug and check the lead is intact.
Remove the spark plug. It shouldn’t be too tight.
Have a look at the plug, paying particular attention to electrode condition, gap and colour. Here is a guide to spark plug colour. You may decide to check the gap, give the plug a gentle clean and put it back in. In my case I had no idea when the mower had last been serviced so I bought a new plug.
I used a good quality NGK plug. The gap is 0.76 mm.
Put a small amount of fresh engine oil on the threads and reinstall the plug, paying attention to the plug manufacturer’s guidance on tightening it up. In my case that was about half a turn beyond hand tight.
Exhaust
Check the exhaust is complete, attached securely and not leaking. Also check the exhaust heat shield is present and attached.
Air filter
This is probably the easiest part of the service. If you’re going to be working on the carburettor it’d probably be best to do the air filter along with the carburettor work.
There is a single screw holding the air filter cover in place at the top. It’s on the right hand side (looking down at the engine with your hands on the controls) at the front. You can use a socket (8 mm I think) or a large flat blade screwdriver. With this screw undone the air filter cover will open outwards, pivoting at the bottom, allowing for removal and replacement of the air filter.
There is also a pre-filter, which is wedged into the outer air filter housing. It’s wire mesh and sponge. The mower I was working on had a grubby and tired looking pre-filter so I changed it. Doing this is just a case of pulling out the old one and gently pressing the new one into the housing. The edges will need to bend as you do this.
Carburettor
I’m going to cover this in some detail but if your mower is running well then you’ll not need to do all of this. In my case this was the most time-consuming part of the Hayter Harrier service.
In my case the engine wouldn’t idle: it would just die when the throttle control was moved from hare to tortoise. In my experience, low speed running problems like this are very often due to the carburettor being blocked with petrol gum or debris. The common situation for gum to build up is leaving the carburettor full of fuel (and without any added fuel stabiliser) over winter when the mower isn’t being used.
Removing the carburettor
I’ll assume you’ve already taken the fuel tank off.
With the air filter and cover removed, undo the 3 x 8mm bolts holding the air filter back plate in position. This can then be removed. You’ll need to disconnect the breather tube from the housing as you remove it.
Unhook the choke spring at the carburettor end.
Remove the 2 x 3/8″ bolts holding the carburettor to the engine. You may need a wobble drive extension for this, depending on the size of your socket! Once these have been removed, the carb should come away from the engine. Gently tip it (left side down) to disconnect it from the governor rod.
Dismantling the carburettor
I like to start by cleaning as much muck from the outside of the carb as possible, usually with a combination of rags, a toothbrush and WD40. I also remove any old gasket material with a blade, being very careful not to gouge the gasket mating surfaces with the blade.
Remove the idle mixture screw (front of carburettor). I usually make a note of how many turns in or out it was, although it will all probably need setting up again afterwards anyway.
Undo the 1/2″ bolt on the bottom of the float bowl and remove the bowl. Have a rag ready as some fuel may come out.
With the carb upside down, slide the float pin out and keep it somewhere safe. This will enable the float to be lifted up. The float valve should come out with it.
Remove the float valve seal. This is a small red ring at the bottom of the float valve ‘hole’. I used a small pair of angled forceps and was very careful not to scratch the carb body. Make a note of the orientation of the seal so you can put the new one back the correct way up. The side with the groove goes in first.
Cleaning the carburettor
In case it isn’t obvious, be as clean and particle-free as you can when doing this job. Lawnmower engines are relatively simple but their smooth running can be completely messed up by the smallest bits of debris in the carb.
When I was doing this cleaning I found that a short length of straw from a WD40 can, pushed into the end of the carb cleaner nozzle, made for an effective way of directing the cleaner where it needed to go.
If the carb cleaner won’t shift the gum / debris, I found using a set of welder tip cleaning brushes and wires worked well to loosen the dirt.
At the more extreme end of the cleaning scale, you can use an ultrasonic bath to loosen the debris. The carb will need a thorough drying with an air gun after this, and will probably still need the carb cleaner treatment to make sure all the channels are clear. Mine is a GT Sonic like this.
Clean the float bowl and remove all old gasket residue from the bowl and carb body.
Clean the float bowl bolt. Note this is more than just a bolt! It also meters fuel, so has a hole through the middle. This needs to be clean, so spray some carburettor cleaner through it.
The next step is to spray the carb cleaner into every channel and hole you can find. Not the blind holes obviously, unless you want carb cleaner in your face! Seriously, it would be a good idea to wear goggles.
Look through the carburettor throat from the engine side. When you open the throttle butterfly you should be able to see 3 small holes on one side of the throat. You need to see a good jet of carb cleaner coming out of each of these when you spray the cleaner into the corresponding hole (jet) on the float bowl side. For one of these, the cleaner will just come out of the idle screw hole so you’ll need to cover it with a finger.

Reinstalling the carburettor
Once everything is clean then it’s time to put it all back together. Remember that new float valve seal. The carburettor refurb kit comes with a new float needle and float pin. It also comes with a new washer for the main jet / float bowl bolt when you come to put that back.
When installing the new idle needle, the suggested starting setting is to screw the needle all the way in and then undo it 1 full turn.
Reinstall the carburettor by reversing the removal steps. Remember the new gasket between the engine and carburettor. I found the linkage easier to connect with the throttle lever on low / tortoise.
The refurb kit also comes with a new air cleaner to carb gasket. This fits onto 2 small locating pins on the back of the air cleaner housing.
Carburettor setup
There are 2 adjustments to make:
- Idle mixture
- Idle speed
Start the engine and leave it running until it is fully warmed up. Once warm and with the throttle control in the ‘tortoise’ position, adjust the idle mixture screw (idle jet) for maximum rpm. Make a small adjustment and wait for the engine to settle before making a further adjustment. In my case the initial 1 turn out setting was rather lean, so the screw needed to be turned anticlockwise.


As you approach the maximum idle speed, you might find the engine is running quite fast. If this happens, just adjust the idle speed stop to reduce the idle speed before continuing to make your mixture adjustments.
Once you’re happy with the mixture adjustment you can make the final adjustment to the idle speed. It is supposed to be 1750 rpm. I adjusted mine by ear rather than using a tachometer.
Fuel filter
I don’t know if the Hayter Harrier has a fuel filter. There might be a gauze type filter in the tank. However in the case of the mower I was working on, there was so much muck in the tank I decided it would benefit from an inline fuel filter.
I was particularly keen to do this because I spent a long time cleaning the carburettor and wanted to do all I could to stop any dirt getting into it. After 20 years, the in tank filter may not have been at it’s best!
I used a small inline filter sold for use on a scooter. It’s important to use a filter designed for use on gravity feed systems, otherwise it will provide too much resistance to fuel flow and will cause running problems.
If your mower has been left for a really long time, it’s probably worth giving it some new fuel hose as well, particularly after the fuel filter. No point having a super clean carb fed by a fuel hose with loads of fuel gum caked on the inside!
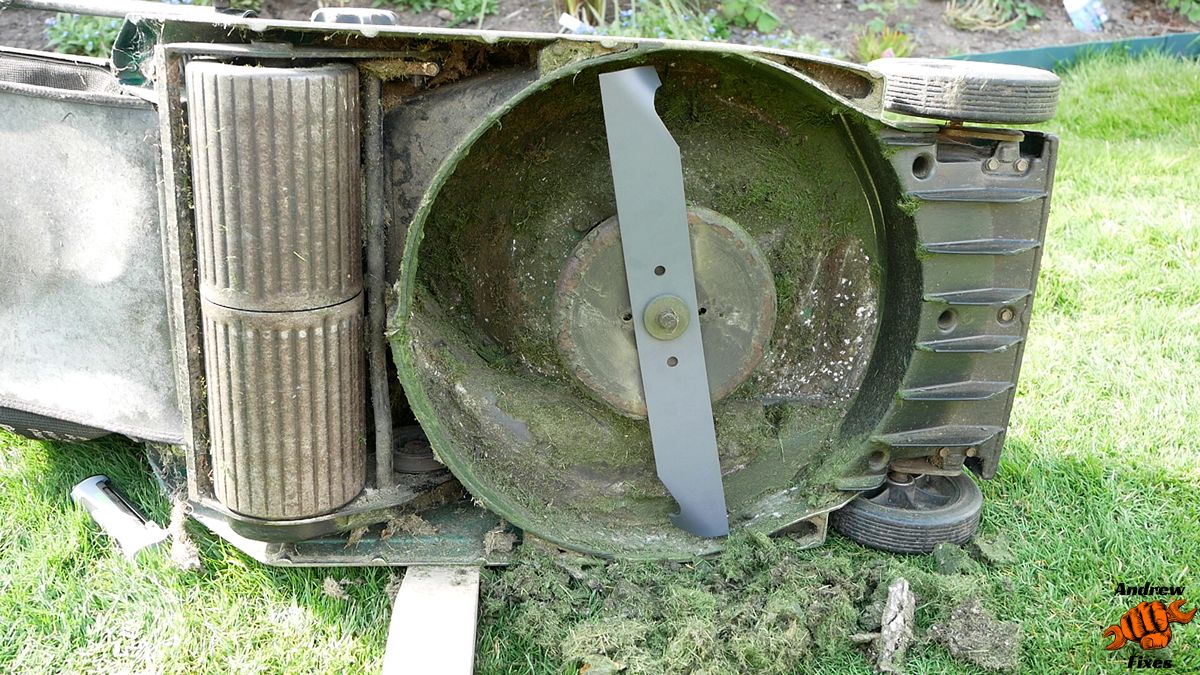
Cutting deck
Cutting blade
With the mower on it’s side, have a look at the condition of the blade. It may well need sharpening. There is a single 14 mm bolt holding it in place. The blade is prevented from turning on the drive flange by the spring tension in the blade alone. I think this is to provide some sort of emergency clutch system, should the operator inadvertently run over a rock or something.
I prefer to use a fairly fine flap disc in an angle grinder to sharpen blades, if they can be saved by some gentle sharpening.
Whilst the blade is off, this is a good opportunity to clean the caked on grass from the deck.
The mower I was working on for this article had quite a damaged blade so I fitted a new one and kept the old one to sharpen up as a spare.
Drive belt
The mower I was working on is an older model Harrier so has a single speed drive. Drive is transferred from the engine to the rear roller via a drive belt, which is tensioned when you push the drive bar towards the handle.
The belt can be checked from underneath and also from the inspection hatch on the upper left hand side of the cutting deck, underneath the exhaust.
While you’re checking the condition of the belt, you could also check the control cable condition at the deck end and lubricate it if required.
Controls
Throttle
It’s important to have the throttle cable adjusted correctly so the mower can actually reach full throttle for cutting and idle correctly as well.
The cable adjustment is fairly straightforward and starts with loosening the throttle cable clamp bolt on the front of the engine.
Looking at the front of the engine, the governor lever needs to be as far to the left as possible. Once it’s in this position, insert a large screwdriver into the gap in the governor lever mounting bracket (see picture below).

Next, move the throttle control lever to the ‘hare’ / fast position, then tighten the cable clamp. The governor lever should be touching the screwdriver at this point. Once the clamp is tight, remove the screwdriver.
Drive clutch cable adjustment
The clutch should start to engage when the clutch bar is 32-38 mm from the handle. If your mower measures somewhere outside this specification, there is an adjuster barrel underneath the throttle lever housing.
Summary
That’s it for the Hayter Harrier service. I hope it was useful and helped you get (or keep) your Hayter Harrier running well.
Want to watch me doing a Hayter Harrier Service?
Here it is! Please consider subscribing to the AndrewFixes YouTube channel while you’re there.


