Want to give your Countax C300 a service? Read on!
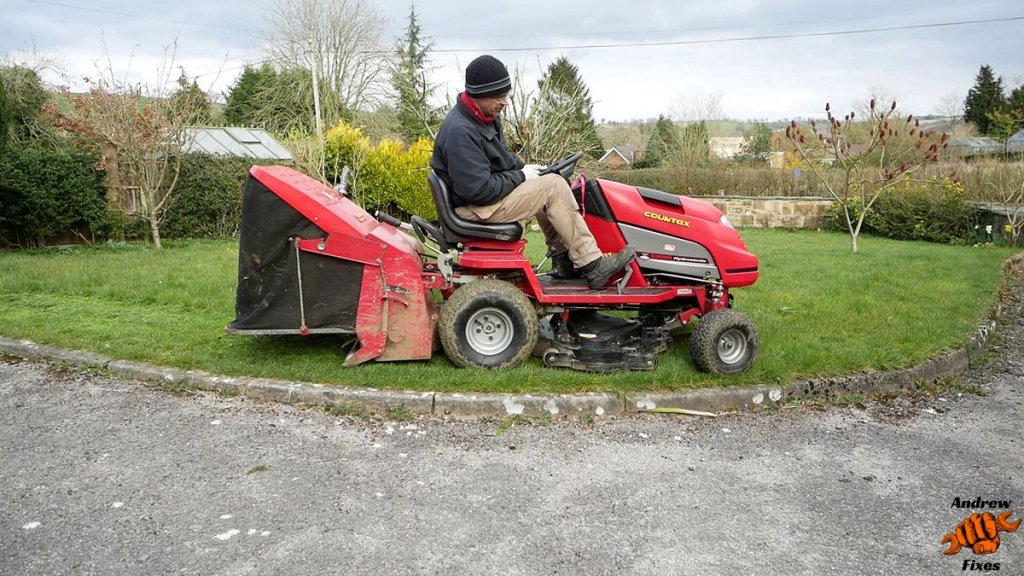
I’m going to cover the steps involved in a Countax C300 service, using a 20 year old C300H I serviced recently as an example. You’ll see from the pictures it’s had a busy life, but is still giving hours of good service so worth looking after.
Tools I Used for the Countax C300 service
- Air blow gun (& the obligatory compressor)
- Air impact wrench (not essential, but helpful for removing the blade bolts).
- 13mm spark plug socket
- 3/8″ ratchet, T bar, extensions and sockets.
- Oil filter removal tool.
- Spring balance and steel rule to check belt tension.
- Angle grinder with flap disc attachment for sharpening blades.
- Rags.
- Oil pan.
Parts for the Countax C300 Service
I used Briggs and Stratton genuine parts, apart from the engine oil, which I already had in stock. Not essential to use genuine parts, but they weren’t much more expensive than non-genuine alternatives and looked to be better quality in many cases.
Engine oil
If you do nothing else in your Countax C300H service, change the engine oil and filter! It’s the most important part of the service and will help your engine have a long and healthy life. By ‘healthy’ I mean it won’t develop excessive oil consumption and lose power due to loss of compression from excess wear due to lack of oil.
Which oil to use? There is lots of conflicting information about this. When the mower was made, I think Countax advised SAE 30 oil. That would still be OK, but not so good in cold weather. As this is a tractor with towbar as well as a lawn mower, it is concievable that it’ll be used in winter to tow a trailer of logs etc. SAE 30 oil will not do the engine any favours when starting from cold on a cold day.
I used a multigrade oil and I recommend you do too – 5w30 or 10w30. In case you’re not familiar, the 30 bit means it behaves like SAE 30 oil when hot (i.e. engine at normal running temperature). The number before the ‘w’ refers to winter and is the viscosity when the oil is around freezing temperatures. Lower numbers mean thinner oil, which will flow better and protect the engine more effectively on those cold starts. SAE 30 oil would actually make the engine hard to start at near freezing temperatures.
It’s also much easier to find a fully synthetic 5w30 than SAE 30 (fully synthetic 10w30 is also quite hard to find). Fully synthetic oils are better quality and Briggs and Stratton recommend them in their engines, due to the higher running temperatures of air cooled engines.
Bottom line: use 5w30 or 10w30 fully synthetic engine oil. You’ll need about 1.4 litres.
Oil filter
I used a genuine Briggs and Stratton oil filter. The part number is 492932S and Briggs and Stratton advise the oil filter is replaced every 100 hours or every season.
Spark plug
The spark plug is a Champion RC12YC, with the gap set to 0.76 mm.
Air filter
This is in 2 parts, the main air filter and a pre-filter.
The pre-filter is a sponge cover for the main air filter. It catches the big bits of muck and stops them clogging the air filter. It’s easy to clean and wash, although unlike some pre-filters, it is not oiled.
I decided to change both, because I had no idea when the tractor was last serviced. For future services, it will probably be enough to blow the debris off the pre-filter and main filter.
Fuel filter
This is the standard red filter found on many Briggs and Stratton engines.
If you use a non-genuine filter, make sure it doesn’t offer too much resistance to fuel flow, as that will create additional problems. Some Briggs and Stratton engines have a fuel pump, so the filter resistance doesn’t matter so much, but this one doesn’t have a pump so important to use the right type of filter.
Countax C300 Engine Service
Engine oil and filter
There is no fixed order to do this, but I find getting the oil draining first is a good idea as it takes a while and you want to get as much of the old oil out as possible.
- Oil drains best when warm, so check the existing oil level then run the engine for a short time to get the oil warm.
- The oil drain point is on the right hand side of the engine, under the steering arm. Remove the yellow dust cap if your tractor still has one.
- Find a piece of tube to fit over the oil drain port. You may still have the original one supplied with your tractor. I didn’t! Fit your tube and use a clip if it isn’t a tight fit.
- Get a container big enough to catch at least 1.5 litres of oil. Put it under the end of the tube. It might help to turn the steering to the left, to get more space on the floor.
- Twist the bayonet drain tap to the open position, then pull it gently towards you (away from the engine). Oil should start to flow. If it doesn’t, you may need to push it back in and pull out again. Don’t pull too hard!
- Wait for the oil to stop flowing, or at least for it to slow to an infrequent drip.
- Unscrew the oil filter. You may be able to do this by hand (it’s only supposed to be done up hand tight) but it’ll be easier to use a filter removal tool. I use this one. Put a rag underneath the filter to catch the oil that comes out. There isn’t really space for a drain pan.
- Once the oil has stopped dripping from the filter housing, clean the sealing surface. Smear a small amount of fresh engine oil on the rubber seal and screw the new filter back on. As tight as you can get it by hand, no more.
- Return the bayonet drain plug to the closed position.
- Fill with new oil. I put about 1.2 litres in at first.
- Start the engine and check for leaks.
- Wait about 10 minutes then check the oil level and top up if necessary. It’s likely to have gone down due to the new filter.

Changing the air filter and pre-filter
- Blow any debris around the air filter housing away. Keep your new air filter out of the way when doing this!
- Prepare your new air filter assembly: fit the pre-filter sponge over the new air filter at this stage so it’s ready to go.
- Undo the plastic nut holding the filter cover in place. Remove the cover.
- This will reveal another plastic nut holding the air filter in place. Undo that one too and remove the air filter.
- Clean any debris, particularly around the filter sealing surface. Make sure you don’t get any bits in the air intake pipework (use a rag to block the hole).
- Fit the new air filter and replace the nut.
- Replace the cover.
For my Countax C300H service, the old air filter and pre-filter had definitely seen better days, so they went in the bin. Yours may be in better condition, in which case you could just blow the debris off and refit them. The sponge pre-filter could also be washed and dried. It doesn’t need oiling.
Spark plug
- Remove the old plug with a plug wrench or socket.
- Set the gap of the new plug to 0.76 mm. This is done by gently bending the ground electrode. Most spark plug gap tools have an attachment to help set the gap.
- Put a few drops of fresh engine oil on the spark plug threads and screw it back in.
- Tighten the plug according to the manufacturer’s instructions. For the Champion plug I used, this means 180 degrees of a turn after the plug is finger tight. If you’re reusing an old plug, the crush washer will already be crushed, so reduce to 90 degrees.
Fuel filter
- Turn the fuel off at the tap. If you don’t have a tap or think it won’t work, use some hose clamps to stop the flow of fuel. If you don’t have any of those, put some old fuel or coolant hose over the jaws of some long nose mole grips / locking pliers and use those.
- Use pliers to release the hose clamps and slide them backwards about 2 inches.
- Have a rag ready to catch any fuel that comes out.
- Pull the filter from the hoses, one at a time. This might be easy or might be a right battle, as it was in my case. It helps to twist the filter to break the seal between filter and hose. You could also use your bluntest flat blade screwdriver to lever the hose away from the filter.
- Replace the filter and clamps.
- Turn the fuel on and check for leaks. Then start the engine and check for leaks again.
Countax C300 Drivetrain Service
Wheels and tyres
Check the tyre pressures: Countax recommend 10-12 psi at the back and 12-16 psi at the front.
Jack up each wheel in turn. You can jack up the whole of the front of the tractor in one go, but at the back it’s probably best to do one side at a time.
Spin the wheels and listen for that special sound of crunchy bearings. Then check for play in the bearings by trying to move the wheel in a direction it shouldn’t go. You’ll see me doing this on the video:
Steering
Wiggle the steering to check for play. A little bit of play is fine, there will always be some. If there is lots of play, this could be:
- Damaged bearings.
- Loose nuts and bolts.
- Worn crescent/quadrant gear or pinion gear.
Have a close look at all the components to find the source of the play.
Clean the debris from the steering gear and apply fresh grease. While in there, use a grease gun to apply grease to the crescent/quadrant gear pivot point.
Belts
There are 6 belts on these tractors (if you have the powered grass collector like the one I was working on):
- Engine to transmission.
- Engine to PTO.
- Engine (via clutch) to deck.
- Internal deck drive belt.
- PTO to powered grass collector.
- Internal powered grass collector brush drive belt.
Check all of these for condition. You might be able to tell from your test drive/cut that one of them is slipping (or not there!). But it’s important to have a look at them too. Check for fraying, missing bits, cracks from perishing and correct tension. Not all of them have a tension specification like the deck drive belt.
Countax C300 Cutting Deck Service
Removing the deck from the Countax C300
- Lower the deck to the lowest cutting height.
- Move the belt tensioning lever to the untensioned position. The lever is under the left hand running board, near the rear wheel.
- This should allow you to move the deck forwards, to slacken the tension on the deck drive belt.
- With the belt slack, remove it from the drive clutch underneath the engine. You won’t be able to remove it from the deck pulley due to the cover.
- Remove 5 clips and pins holding the deck in place. They’re different lengths so remember where they go.
- You should now be able to slide the deck out from under the tractor sideways. You may need to lift the deck mounts up out of the way at the same time.
Checking the deck
Clean the dried grass off the underside of the deck using something that won’t scratch the paint and increase the opportunities for rust to start. These decks love to rust and the costs of replacement are substantial.
With the deck clean, have a look for rust. You may want to go all out and strip the deck down completely to give it a fresh coat of paint or your favourite rust protection gloop. Mine is Bilt Hamber Dynax S50.
Wiggle the blades from side to side and rotate them slowly, to check their bearings for signs of wear.
Remove the blades and sharpen them if they need it. I use a flap disc in an angle grinder, because it seems to be a good balance between speed and precision: sharpening stone = too slow, grinding disc = too aggressive. Remember to check the blades are balanced before putting them back.
Remove the belt cover on the deck and check the condition of the belt underneath. It won’t come off all the way without removing the drive pulley and cover, but you can lift it up enough to check on the belt.
Clean and grease the mounting points before reinstalling. The deck needs to be able to slide freely, particularly on the front mounting points.
That’s about it for checking the deck.

Installing the deck and checking belt tension
Putting the deck back on is quite straightforward. You may need to lift it up slightly whilst putting the pins in place. Make sure the tensioning bar is attached to the front of the deck too.
- Move the tensioning lever back to the tensioned position.
- Set the deck height on the middle position.
- Grab your spring balance and a ruler. I used a luggage weighing scale as it was the only spring balance I had to hand.
- Apply 2 kg of force to the mid point of the belt and measure how much it moved from it’s resting position. The movement should be 13mm.
- If your measurement is more or less than this, follow the tensioning rod forwards from the tensioning lever to the front of the tractor until you find the threaded portion of the rod, which should have a trunnion attached. Adjust the position of the trunnion on the rod until you have the required belt tension.
Safety checks
There may be others, but the main ones for me are:
- The engine should only start if the parking brake is on.
- The blades should stop if you stand up off the seat.
Your Countax C300 service is complete!
That’s it, you’re done! I hope this helped you look after your Countax C300 tractor. Happy mowing!
In case you missed it earlier, here is a video of me servicing a Countax C300.


Very helpful! I would like to see a blog about adjusting the parking brake on Countax C series. And how about tuning/carb adjustment/ cleaning? Do youmake videos of your work?
Hi David
Thanks for your comment. Yes I do make videos of my work – unfortunately there isn’t time to video everything but I do make them whenever I can. Alas I don’t have anything about parking brake adjustment or carb adjustment yet, but I’ll add them to the list. I’ll be looking for a ‘project’ Countax over the winter so if that goes ahead I’m sure it will yield some good material.
Cheers
Andrew
Does my countax C300H have an oil filter? I can’t find it!
Thanks Brendan
Hi Brendan
We’ve already discussed this by email but for the benefit of other readers I’ll reply here too. From the pictures you sent, it appears the Briggs and Stratton engine on your Countax doesn’t have an oil filter. I sent you a link to the Briggs and Stratton website so you could check the correct manual for your engine to be sure.
Thanks
Andrew
Thank you for your knowledge,
My c300 same as yours has the PTO pulley spinning even when disengaged under the seat. Is there an adjustment to rectify?
Hi,
Thanks for your comment. There is a clutch mechanism and it should stop the drive to the PTO pulley when the lever is in the appropriate position. Moving the lever should move 2 jockey pulleys underneath that apply or release tension on the PTO belt, acting as a clutch. Hard to say for certain what’s causing the problem without seeing it, but it may be that the trunnion on the PTO engage rod needs adjusting underneath, or it may be that the return spring has broken. Or perhaps the jockey pulley plate is seized onto its mounting point.
Hope you manage to get it sorted out.
Andrew
Fuel in oil on countax c300?
Hi Andy, that sounds like a leaking float valve in the carburettor. Another possible culprit is the fuel solenoid, if your engine has one of those screwed through the bottom of the float bowl.
In case it isn’t obvious, don’t run the engine until you’ve changed the oil. If yours has a fuel tap between the carb and the tank then I’d use that to turn off the fuel after mowing, at least until you get the fuel leak fixed.
Andrew
Hi looking for the pto belt from the tractor to the brush/collector the one from under the seat any links?