If you plan on using your Lotus Elise for track days or other uses not involving the public highway(!), you may want to fit a decat pipe or cat replacement pipe. As the name suggests, the Lotus Elise catalytic converter replacement pipe is a ‘straight through’ piece of exhaust pipe to replace the catalytic converter. The benefits are less restrictions to exhaust flow (so potentially more power) and a better noise. And we all know that exhaust noise is directly proportional to speed and driver prowess.
In preparation for this job, you’ll obviously need the catalytic converter replacement pipe, but I would also advise a new pair of gaskets and a full set of new nuts and bolts. You’ll see why as you read on…
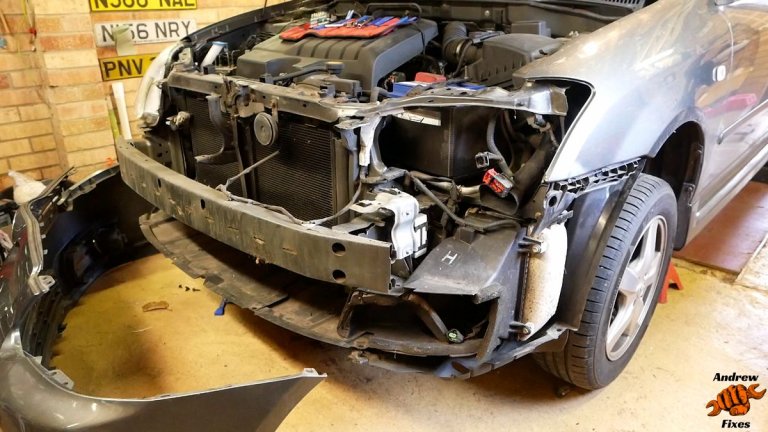
You’ll gather from the picture this article applies to the series 1 Lotus Elise with the Rover K series engine. Not sure how it applies to the newer Toyota engined models – I haven’t worked on one of those yet.
Step 1 – Access
You need to remove the rear undertray for this job, so you’ll need to raise the rear of the car. You could:
- Jack the car up, using the jacking points at the side of the car, one side at a time. Get 2 blocks of wood / concrete / something solid that are the same height. Put the wood under the rear wheel, lower the wheel onto the block. Repeat on the other side.
- Reverse the rear of the car onto ramps (remembering to chock the front wheels)
- Use a pit.
- Use a lift.
For this demonstration I’m using a pit, but I’ve done the same job before using ramps.

Step 2 – Undertray
Remove the 8mm bolts around the edge of the undertray. There are 10 in total. At this point, the undertray will / should be held in place by 2 larger Allen head bolts. As you loosen these bolts, the undertray will start to fall. I usually remove one of the bolts completely, then support the tray with head / shoulder / arm whilst removing the other. You’d be well advised to wear eye protection, because as you lower the undertray, there will probably be a load of grit on the inside, some of which might head towards your face.

Step 3 – Locate catalytic converter
Locate the catalytic converter – hopefully the picture below will help if you’re unsure.

Loosen the nuts (x6) holding it in place. It was so easy to write those 7 words in the last sentence. You might not find it quite as easy to deliver their instruction! I was fortunate when taking the pictures for this article in that I’ve already fitted a sports exhaust, battled with rusty nuts and replaced them with stainless nuts and bolts.

If you’re reading this, it is likely your exhaust bolts haven’t been touched before so it might be worth some pre-emptive soaking with your favourite penetrating fluid. I make my own! The nuts nearest the outside of the car (left hand side) are likely to be worse than those on the right, which will have been better protected by the undertray.

Step 4 – Loosen the nuts
Remove 2 of the 3 nuts and bolts on each side of the catalytic converter.


On the left side, I recommend that the bolt you leave in is the one with the hanger going through it, so the rest of the exhaust system remains supported.

Step 5 – Remove the catalytic converter
The cat is heavier than it might appear! If your Elise still has the original exhaust, 2 of the 3 bolts on the right will also be holding another exhaust bracket in place.

Next, remove the nuts off the last 2 remaining bolts. Then support the cat with one hand and withdraw the bolts with the other. Store the cat somewhere safe. It’s probably worth plugging the ends with a rag or taping them up to stop dust / spiders etc getting in whilst it’s on the shelf. If there is any rust on the flanges of the remaining exhaust pipe, clean this off with a wire brush / sandpaper / flap wheel.

Step 6 – Fit the Lotus Elise catalytic converter replacement pipe
On with the decat pipe. Make sure you’ve got the decat pipe the right way round, so the flanges line up with the existing pipework. Grab a gasket and a bolt. I found it best to put the bolt through the existing exhaust flanges first, i.e. from the outside in. I started with the right hand side flange (the one without the hanger), so I could get one bolt in to hold the weight of the decat pipe, making it easier to then line the first bolt on the left hand side up with the hanger.

A note about exhaust jointing compound. I’ve never found the need to use it for this job, and haven’t had any issues with leaks. You might need it but I’d try without first. Once the bolt is part way through the existing exhaust flange, offer up the decat pipe and gasket and push the bolt all the way through. Now you can screw a nut onto the bolt. Just a couple of turns at this stage, enough to stop if coming off. I’d highly recommend using some anti seize compound. I use copper grease. Next, do the same thing on the other side, starting with the front upper bolt first. The hanger goes through this one. Put the remaining nuts and bolts in place, ensuring everything is assembled loosely before tightening anything up.
Tighten up all the nuts, make sure everything is secure. Your Lotus Elise catalytic converter replacement pipe is now in place! Time to start the engine!
Step 7 – Check for leaks
After a brief moment marvelling at the throaty sound your car now makes and patting yourself on the back, check for leaks! If you have a large leak, you’ll hear it. You can check for smaller leaks by holding your hand close to the flanges and feeling for the leak. This is best done quite quickly, before the exhaust gets hot.
If you’re working in a pit as I was for this job, you’ll want to be quite quick anyway, because exhaust gases will collect in the pit over time.
Before you put the undertray back on, may I encourage you to have a general look over the engine bay and rear suspension from underneath. A good torch will help. This is a good opportunity to check for leaks, chafed wires or hoses, broken parts. In this case, I found that one of the rivets holding the heat shield to the chassis had completely corroded away, leaving the heat shield loose. I’d noticed the car had a slight vibration noise when driving it in to the garage, and this appeared to be the cause.
Step 8 – Refit undertray
Refit the undertray. Use the 2 big Allen bolts to hold it in place first, then put all the peripheral bolts in loosely. After this, tighten the peripheral bolts (don’t overdo it) then tighten the 2 large Allen bolts.
Enjoy!